Height increasing stretching exercises are mainly categorized into three groups, the ones you do laying down, the ones you do standing up and the ones you have to twist sideways. There’s a total of 28 exercises I will show you now, you should pick between 10-14 to do only a daily routine 6 days a week (7 is even better), remember to pick a few from each different category as you want to stretch all parts of your body.

A mistake many beginners make is to start these exercises hardcore, I will give you an amount of time you should hold the stretching positing before you relax, eg: 4-10 seconds, don’t do the 10 seconds from the beginning, start of with just holding for 4 and then gradually build the time up. TONS of newbies make that mistake and then start to get sore muscles and joints, after that they get discouraged by the pain and give it up completely.
One of the most important things to remember while doing these exercises is the breathing, learn how to control your breathing as it will oxygenate the pituitary gland which will release more human growth hormone. A trick that works while doing the exercise is to inhale for five seconds (count in your head 1 – 10) hold breath for 5 seconds and then exhale for 5 seconds. After you have done 2 repeats of an exercise you should lay belly down and do a couple of rounds of controlled breathing before moving on to the next exercise, this will help your body relax. Alright, lets get to it:
LAYING DOWN STRETCHES
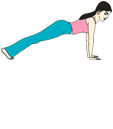
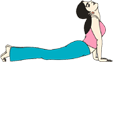
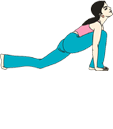
Cobra

Lie on the floor face down with palms on the floor under your shoulders. Begin to arch your spine up leading with your chin. Arch as far back as possible.
Each repetition should last between 5-30 seconds.
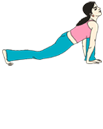
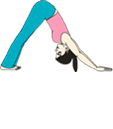
Super Cobra

Start with your arms perpendicular to the floor, and the spine arched (the end position of the cobra).
Now bend your hips
and bring your body up into an inverted ‘V’ position. While you are doing that, tuck your chin against your chest. Return to the original position.
Each repetition should last between 10-20 seconds.
Cat Stretch

Get on your hands and knees with your arms locked out.
Inhale as you flex your spine down and bring your head up. Exhale as you bring your spine up into an arched position while bringing your head down.
Each repetition should last between 3-8 seconds.
Basic Leg Stretch

Sitting down, spread your legs far apart. Reach for your toes. Try to keep your knees as straight as possible. Now move into reaching for the toes on the other leg. Be sure to keep your spine straight and move from your hips. Do not arch the upper spine. This stretch works both your spine and legs.
Each repetition should last between 6-15 seconds.
Bridge

Lying down with your knees bent and feet flat on the floor as close to your butt as possible, grab your ankles and hold onto them while you raise your hips up and arch your spine, lifting your abs towards the ceiling.
Lift your abs as high as possible. Go back down. If you can’t hold onto your ankles, keep your arms to the side and use them to help push yourself up.
Each repetition should last between 3-10 seconds. This stretch may be hard to do at first, but be persistent even if you can’t do it completely right at first.
Table

Sit down on the floor with your legs straight. With your torso straight, place the palms of your hands on the floor next to your butt. Then tuck your chin against your chest. Now bring your head back as far as it will go.
While doing that, raise your body so that your knees bend while the arms stay straight. The torso and upper legs will be straight and horizontal to the floor. Your arms and lower legs will be perpendicular to the floor. You will be the shape of a table.
This is another hard stretch for some. If you can’t do it right away, just do the best you can, eventually you will be able to do it with ease.
Each repetition should last between 8-20 seconds.
LAYING DOWN STRETCHES
One Straight Leg Up

Lying on your stomach with your hands behind your neck, raise one of your legs as high and as far up as possible. Now repeat with the other leg. Keep your legs straight.
Each repetition should last between 3-5 seconds.
Two Straight Leg Up

Lying face down with your palms down and on the sides, raise both your legs up together as high as possible. Keep your feet together.
Each repetition should last 3 seconds.
Bowl

Lying face down, raise both your arms and legs up at the same time.
Each repetition should last 3 seconds.
Upper Body Slant

Sitting on the edge of a slant board with your legs straight, lean back as far as possible so that your upper body is completely off of the slant board. If you don’t have a slant board, you can easily create one with a board and a bucket.
Each repetition should last 4-5 seconds.
Lower Body Slant

With your upper body lying on a straight bench and your butt on it while your legs are completely straight, lean your upper body forward and bring your nose to your knees.
Each repetition should last between 4-5 seconds.
Bench Stretch

Sitting on a straight bench with your arms raised above you, slowly lean back so that your upper body is off the bench and horizontal to it.
Each repetition should last about 6 seconds
Incline Upper Body Slant Stretch

Sitting on the upper part of an incline bench with your legs straight and hand together behind your neck, lean back over the edge as far as possible.
Each repetition should last 4-7 seconds.
Acrobat

Lying on your back with your knees bent and hands next to your head with the palms flat against the floor, push off your feet and hands to raise yourself up as high as possible.
Each repetition should last about 8-15 seconds.
STANDING UP STRETCHES
Bow down

Standing up with hands held together behind your neck, bend your head upwards and back as far as possible. Remember don’t push down to hard just as far as your spine lets you without feeling pain, your aim is to feel the stretch so like many other things, overdoing it can be harmful.
Each repetition should last 5-15 seconds.
Yawn

Standing up with hands held together behind your neck, bend your head upwards and back as far as possible.A little thing that really comes in handy in most of these exercises is finding a spot on the wall you can concentrate on while doing the exercise.
Each repetition should last 5-15 seconds.
Super Stretch

Standing up, reach your hands up as high as you can as you lean slightly back. Feel the stretch in your lower spine. The Super Stretch can be done standing up or lying down.
Because this stretch is easy and comfortable, we encourage you to do this not only as part of a program but also at odd times like when you are watching TV or lying in bed.
Each repetition should last between 4-7 seconds.
Hands on the Head Bow Down

Standing with your hands together behind your neck, bend forward as far as possible. Lead with your head. Bring your chin into your chest. Don’t bend your knees.
Each repetition should last between 4-8 seconds.
Wall Stretch

Standing up against a wall, reach your hands up as high as possible while getting on you tip toes. Keep your spine flat against the wall as much as possible.
Each repetition should last between 4-6 seconds. This stretch is harder than it tooks because you are keeping your spine straight against the wall.
Super Stretch #2

Standing up, face 4 inches (10 cm) from a wall, reach as far up onto the wall as possible getting on your tip toes.Some complain that the ceiling in their rooms is not high enough, if this is the case you can spread your arms a bit (forming a Y with your body) instead of stretching straight up.
Each repetition should last about 3-5 seconds.
Touch Toes

Standing with your hands high above your head, bend over and touch your toes. Keep your legs as straight as possible. You can bend your knees a little if need be.After a few weeks of performing this exercise you will start to notice you can touch reach further down than you could when you started, if at first you cant reach your toes you can eather bend you knees or reach as further down as you can.
Each repetition should last between 2-3 seconds.
The Skier

Standing with your legs 3 feet (1 m) apart and your arms raised over your head as high as possible, bend forward at your waist and push your arms through your legs. This is the same exercise used in some gyms with an exercise ball but for now just stick to doing it with your own strength, you should feel a stretch in your spine.
Each repetition should last about 5 seconds.
Sky Stretch

Kneel on the floor with your body straight and your hands against your thighs. Bring your neck and head forward and tuck your chin to your chest. Then bring your neck and head as far back as possible while you arch your spine.
Each repetition should last between 6-8 seconds.
Super Sky Stretch

On your knees with your arms stretched upwards and hands together, lean your head and arms back as far as possible.Try and form the letter C with your body without putting too much strain on your back, also try and push your arms out as far as possible to stretch them as well.
Each repetition should last about 5 seconds.
Downhill

Standing with your hands together and arms behind you, bend down at the waist as far as possible as you slowly swing your arms as high as possible behind you.
Each repetition should last between 4-6 seconds.
Standing Table Hold

Standing with your hands holding a table and your upper body horizontal to the table, have someone push against your upper back as you stretch.
Each repetition should last 10-15 seconds.
TWISTING STRETCHES
Basic Twist

Standing with your arms straight out at shoulder level, twist your upper body to the left and right while your legs and hips remain still.
The twist to each side should last between 2-4 seconds.
Bar Twist

Standing with a broom or bar way over your head, twist to your left and right. Twist to one side stretch and hold, then twist to the other side and stretch and hold.For this one you can do a few more repetitions than usual, four should be fine as this exercise is a great way to make the spine more flexible together with the Cobra exercise.
You should hold each repetition on each side for 3-4 seconds.
Hanging Hanging relies on gravity to decompresses the spine lengthen and straighten to obtain height increase. Nothing complicated, just find a bar and hang on it for at least 10 seconds repetitions or as long as you can for 5 minutes a day, you must hang a total of 30 minutes a week at least (the more you do the better).